Friday, January 23, 2015

Beekeeping for Beginners - Beekeeping Supplies You Need to Get Started

If you’re ready to try your hand at beekeeping, it’s likely you already understand and appreciate all of the benefits of bee farming. But just in case… beyond having delicious, fresh honey available to you in your own backyard, beekeeping can help your garden and farm crops thrive through increased pollination, help deter aggressive Africanized honey bees by diluting the populations, provides wax from the honeycombs that can be used to create a wide range of natural products, and is an excellent stress-relieving activity.

Sounds great right?

Before you can get started, there are several beekeeping equipment must-haves you will need in order to be successful and keep yourself safe.


Beekeeping Clothing

While it is recommended that all level beekeepers wear protective clothing, it is especially important for beginner beekeepers to protect themselves against the threat of stings.

Veil – A beekeeping veil will protect your head, face and neck from beestings. Be sure to pick a veil with seamless, one-piece construction so there are no seams to inhibit your visibility.

Coveralls - Coveralls provide full-body coverage from the threat of stings. The best coveralls will be white or light in color and have elastic closures at both the ankles and wrists. Be sure you don’t wear any clothing you mind getting dirty or stained. Bees produce a waste that leaves a yellowish stain, and this is why you see so many bee handlers sporting a pair.

**IMPORTANT: Never wear clothing that has been previously stung. Bees release a pheromone when they sting to alert other bees of an attacker. By wearing previously stung clothing, you are basically inviting the bees to sting you!

Beekeeping Gloves – Many advanced or experienced bee farmers will forgo wearing gloves when tending to their bees because it is easier to manipulate and work inside the box. However, this is definitely not recommended for beginners. It is always recommended that you wear head-to-toe protection until you have gained some experience working with the bees and are confident in your abilities.

**TIP: If the coveralls you are wearing do not have elastic closures at the wrists and ankles, tuck your pants into your socks and shirt sleeves into your gloves and tie a string or some other type of band around wrists and ankles to secure clothing in place.


Beekeeping Supplies

These are the basic beekeeping supplies you will need to get started. There are many other beekeeping products available to help you get the job done faster and easier, but we will cover those in an upcoming post.

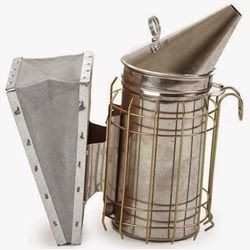
Bee Smoker – Smoke, if used properly and not excessively, will help to calm the bees and reduce your chances of being stung. A large smoker is best, as the smoke will last for a longer amount of time. Don’t forget to stock up on smoker fuel! Be sure to keep the smoker full of fuel and burning the entire time you are working with your bees.

Hive Tool – This is a device that is used like a lever to loosen both frames and boxes.

Beekeeping Brush – A beekeeping brush gently removes bees from the frames both during inspection of the hives and during removal of frames for honey extraction. The soft bristles are specially designed to remove the bees without harming them.

Hives – Perhaps one of the most important and complex pieces of equipment you will need for beekeeping, you can buy the individual pieces separately and assemble it yourself or you can purchase a complete bee hive frame that is pre-assembled for easy setup and use. We will dive deeper into bee hives in an upcoming post.


Be sure to check back for future installments of our Beekeeping for Beginners blog post series. We will be covering a wide range of topics from building a bee hive, urban beekeeping, and fun ways to use your liquid gold! Have specific questions for us about beekeeping and beekeeping equipment? Send us your questions in the comments and be sure to visit us at www.parisfarmersunion.com.

Monday, January 5, 2015

How to Winterize a Garden

When the days are at their shortest and the temperature drops, it’s time to tuck your plants in for a long, cold winter.

If you have one, you may be wondering if winterizing a garden is absolutely necessary, and the answer is no. However, if you want to save yourself a ton of extra work in the spring, it’s a must. Trust us – your springtime self will be thanking your winter self!

Preparing a garden for winter does require you to get down and dirty, but with the following tips and tricks, it will go smoothly and your plants and flowers will be ready to brave whatever Mother Nature has in store for them.

Remove Dead and Dying Plants & Clean Up Debris

The first thing you want to do is remove all weeds and dead or dying foliage that could become a breeding ground for pests and disease during the winter months. You can either dig out unwanted plants or use an herbicide. Remove as many seeds and pods from invasive plants as you can to avoid any unwanted new growth the following season. Be sure to dispose of them in a closed garbage container, not in your compost pile! If you have a large area of growth that you want to get rid of, cover the entire area with black plastic weighed down with rocks or bricks to smother the area over the winter and prevent it from spreading any further.

Nourish Your Soil Now So You’re Ready to Go in the Spring

Since you just tidied up your garden beds, it’s the perfect time to get a head start and prepare them for spring. Add a layer of compost about 3-4 inches deep across your beds. The rain and snow will help activate the compost and nutrients will leach into the beds. The remaining compost at the end of the season can be turned into soil when you start planting in the spring.


Divide Perennials Now to Minimize Shock

If you have been wanting to cut up and move sections of perennials to other areas of your yard, now is the time to do it. Perennials go dormant in the fall, so dividing them up now will help reduce shock from cutting, moving and replanting. The seasonal rain and moisture will provide them with a healthy dose of water, and in the spring, you’ll have thankful perennials that are ready to grow!

**Many perennials can benefit from division about every three to five years. A section of plants should be divided if you notice it is not flowering as well as it had in the past or if plants spread to the point of becoming invasive.

Water for Thorough Hydration During a Long Freeze

Even though the winter months can be full of rain and snow, it also comes with freezing temps that lock up vital moisture in the ground and create a drought-like situation for vegetation. Before temps drop and the ground freezes solid, give your perennials and trees a thorough watering for a good hydration status that can last throughout the season.

**If you live in an area where the ground freezes through, it is a good idea to spread a thick layer (4 to 8 inches) of mulch over your prepped gardens. This layer of mulch will serve as a blanket, protecting fragile plants from bitter temperatures and bone-chilling winds.

Protect Young and Delicate Plants from Brutal Winds

There are a number of things you can do to add an extra layer of protection to fragile foliage.

  • Loosely wrap shrubs and trees in burlap
  • Hinge together two pieces of plywood and create a tent-like cover
  • Encircle plants with wire fencing stuffed with dried leaves or straw
  • Apply an antidesiccant spray for a warm, waxy coating that doubles as a deer repellent


Clean Up Odds & Ends

  • Empty and store all outdoor containers to keep them from freezing and cracking during the winter
  • Before the temps drop, hang your garden hose over a railing or from a tree branch to drain all water then roll it up and put it away
  • Mow your lawn as late into the fall as you can; grass that has been left too long at the start of winter will result in unsightly brown patches in the spring
  • Cover your compost pile with a tarp or a thick layer of hay
  • Drain the fuel from the lawn mower and clean off and store all garden tools to avoid rusting

Is there anything that we missed? Let us know what important steps you take to prepare your garden for the winter and any winter gardening tips you have in the comments below!