Tuesday, February 24, 2015

Beekeeping for Beginners – Components of a Beehive

Since you will be relying on hundreds or even thousands of worker bees for your honey yield, it’s important to familiarize yourself with the various components of the beehive that serves as their home, workplace and breeding ground in order to ensure an ideal environment. Also, knowing how a beehive is constructed will help you in inspecting, manipulating, and managing your colony.

Whether you’re looking to build your own beehive or purchase a complete frame, the bottom-to-top guide below is sure to help you reap the sweetest of rewards.

Elevated Hive Stand

While not necessary, you might find it useful to build your hive on top of an elevated hive stand, allowing you to more easily inspect and manage your colony. Lifting your beehive off of the ground will result in opening up the entrance and likely improving air circulation.

Bottom Board

The bottom board serves as the floor of the hive, protecting your colony from the ground below. While it is normally constructed from a solid piece of wood, a screened bottom board that improves ventilation may also be installed.

Entrance Reducer

The entrance reducer is typically a notched cleat (grass works in a pinch!) that is placed loosely at the hive’s entrance and acts as a barrier in order to control access to the hive, especially at times when your hive may fall victim to invasion. It’s also useful in controlling ventilation during the cooler months. Things like a beehive entrance feeder, which allows for nourishment when natural food resources are scarce, can be attached to the entrance reducer to increase accessibility to things like food within the hive.

Deep Hive Body

Essentially boxes used to house frames of comb, deep hive bodies are typically stacked on top of each other to provide the bees with two main compartments – the lower deep and the upper deep. The lower deep is the brood chamber and is used as a nursery to raise thousands of baby bees, while the upper deep is used as the food chamber that houses honey and pollen to be used by the bees themselves. In areas that aren’t susceptible to below freezing temperatures, one deep should be fine for both the brood and their food, but food levels should be closely monitored at all times.

Plastic Queen Excluder

Designed to prevent the queen from accessing the honey supers, the queen excluder is placed between the upper deep “pantry” chamber and the supers. A wooden or plastic frame typically holds a grid of metal wire or a perforated sheet of plastic with openings that are sized to allow worker bees to move freely throughout the hive, but keep the queen from moving up out of the brood box.

Honey Super

While the honey in the upper deep belongs to the bees, whatever you collect from the honey super is surplus and yours for the taking! While identical in design and construction to deep hive bodies, supers tend to be more shallow for easier handling and come in both shallow (5 ¾ inches high) and medium (6 5/8 inches high) sizes, depending on how much honey you are expecting to collect. The lighter weight makes them easier to maneuver and the ability to stack on more honey supers as your hive grows leaves you with the opportunity to increase your sweet harvest year by year.

Frames

Where all the magic happens, the frames are where the bees build their honeycomb and their ability to be removed easily from the rest of your hive allows for easy inspection and maintenance of your colony. Each frame can also be pulled from the hive using a beekeeping frame grip. A single sheet of beeswax foundation is held by the frame and houses the combs from which you will extract your honey. Regardless of the construction of your hive, frames come in sizes made to fit deep hive bodies, and both shallow and medium honey supers.

Inner Cover and Outer Cover

The inner and outer covers are stacked at the very top of your beehive. The outer cover is a shallow tray with a hole in the center and may have a notch along one of the lengths of the frame to be positioned at the front of the hive for added ventilation. The outer cover acts as a rooftop and is typically covered with some kind of weatherproof material, like cedar shingles or aluminum flashing, for added protection. Cypress wood resists rot and is long lasting, so it’s a great option when you’re looking to buy or build your covers.

Stay tuned for more from our Beekeeping for Beginners blog post series! For any questions or comments, and all of your beekeeping needs, visit us at www.parisfarmersunion.com!

Friday, January 23, 2015

Beekeeping for Beginners - Beekeeping Supplies You Need to Get Started

If you’re ready to try your hand at beekeeping, it’s likely you already understand and appreciate all of the benefits of bee farming. But just in case… beyond having delicious, fresh honey available to you in your own backyard, beekeeping can help your garden and farm crops thrive through increased pollination, help deter aggressive Africanized honey bees by diluting the populations, provides wax from the honeycombs that can be used to create a wide range of natural products, and is an excellent stress-relieving activity.

Sounds great right?

Before you can get started, there are several beekeeping equipment must-haves you will need in order to be successful and keep yourself safe.


Beekeeping Clothing

While it is recommended that all level beekeepers wear protective clothing, it is especially important for beginner beekeepers to protect themselves against the threat of stings.

Veil – A beekeeping veil will protect your head, face and neck from beestings. Be sure to pick a veil with seamless, one-piece construction so there are no seams to inhibit your visibility.

Coveralls - Coveralls provide full-body coverage from the threat of stings. The best coveralls will be white or light in color and have elastic closures at both the ankles and wrists. Be sure you don’t wear any clothing you mind getting dirty or stained. Bees produce a waste that leaves a yellowish stain, and this is why you see so many bee handlers sporting a pair.

**IMPORTANT: Never wear clothing that has been previously stung. Bees release a pheromone when they sting to alert other bees of an attacker. By wearing previously stung clothing, you are basically inviting the bees to sting you!

Beekeeping Gloves – Many advanced or experienced bee farmers will forgo wearing gloves when tending to their bees because it is easier to manipulate and work inside the box. However, this is definitely not recommended for beginners. It is always recommended that you wear head-to-toe protection until you have gained some experience working with the bees and are confident in your abilities.

**TIP: If the coveralls you are wearing do not have elastic closures at the wrists and ankles, tuck your pants into your socks and shirt sleeves into your gloves and tie a string or some other type of band around wrists and ankles to secure clothing in place.


Beekeeping Supplies

These are the basic beekeeping supplies you will need to get started. There are many other beekeeping products available to help you get the job done faster and easier, but we will cover those in an upcoming post.

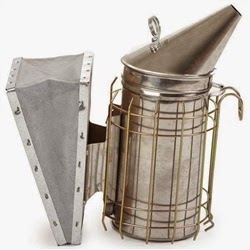
Bee Smoker – Smoke, if used properly and not excessively, will help to calm the bees and reduce your chances of being stung. A large smoker is best, as the smoke will last for a longer amount of time. Don’t forget to stock up on smoker fuel! Be sure to keep the smoker full of fuel and burning the entire time you are working with your bees.

Hive Tool – This is a device that is used like a lever to loosen both frames and boxes.

Beekeeping Brush – A beekeeping brush gently removes bees from the frames both during inspection of the hives and during removal of frames for honey extraction. The soft bristles are specially designed to remove the bees without harming them.

Hives – Perhaps one of the most important and complex pieces of equipment you will need for beekeeping, you can buy the individual pieces separately and assemble it yourself or you can purchase a complete bee hive frame that is pre-assembled for easy setup and use. We will dive deeper into bee hives in an upcoming post.


Be sure to check back for future installments of our Beekeeping for Beginners blog post series. We will be covering a wide range of topics from building a bee hive, urban beekeeping, and fun ways to use your liquid gold! Have specific questions for us about beekeeping and beekeeping equipment? Send us your questions in the comments and be sure to visit us at www.parisfarmersunion.com.

Monday, January 5, 2015

How to Winterize a Garden

When the days are at their shortest and the temperature drops, it’s time to tuck your plants in for a long, cold winter.

If you have one, you may be wondering if winterizing a garden is absolutely necessary, and the answer is no. However, if you want to save yourself a ton of extra work in the spring, it’s a must. Trust us – your springtime self will be thanking your winter self!

Preparing a garden for winter does require you to get down and dirty, but with the following tips and tricks, it will go smoothly and your plants and flowers will be ready to brave whatever Mother Nature has in store for them.

Remove Dead and Dying Plants & Clean Up Debris

The first thing you want to do is remove all weeds and dead or dying foliage that could become a breeding ground for pests and disease during the winter months. You can either dig out unwanted plants or use an herbicide. Remove as many seeds and pods from invasive plants as you can to avoid any unwanted new growth the following season. Be sure to dispose of them in a closed garbage container, not in your compost pile! If you have a large area of growth that you want to get rid of, cover the entire area with black plastic weighed down with rocks or bricks to smother the area over the winter and prevent it from spreading any further.

Nourish Your Soil Now So You’re Ready to Go in the Spring

Since you just tidied up your garden beds, it’s the perfect time to get a head start and prepare them for spring. Add a layer of compost about 3-4 inches deep across your beds. The rain and snow will help activate the compost and nutrients will leach into the beds. The remaining compost at the end of the season can be turned into soil when you start planting in the spring.


Divide Perennials Now to Minimize Shock

If you have been wanting to cut up and move sections of perennials to other areas of your yard, now is the time to do it. Perennials go dormant in the fall, so dividing them up now will help reduce shock from cutting, moving and replanting. The seasonal rain and moisture will provide them with a healthy dose of water, and in the spring, you’ll have thankful perennials that are ready to grow!

**Many perennials can benefit from division about every three to five years. A section of plants should be divided if you notice it is not flowering as well as it had in the past or if plants spread to the point of becoming invasive.

Water for Thorough Hydration During a Long Freeze

Even though the winter months can be full of rain and snow, it also comes with freezing temps that lock up vital moisture in the ground and create a drought-like situation for vegetation. Before temps drop and the ground freezes solid, give your perennials and trees a thorough watering for a good hydration status that can last throughout the season.

**If you live in an area where the ground freezes through, it is a good idea to spread a thick layer (4 to 8 inches) of mulch over your prepped gardens. This layer of mulch will serve as a blanket, protecting fragile plants from bitter temperatures and bone-chilling winds.

Protect Young and Delicate Plants from Brutal Winds

There are a number of things you can do to add an extra layer of protection to fragile foliage.

  • Loosely wrap shrubs and trees in burlap
  • Hinge together two pieces of plywood and create a tent-like cover
  • Encircle plants with wire fencing stuffed with dried leaves or straw
  • Apply an antidesiccant spray for a warm, waxy coating that doubles as a deer repellent


Clean Up Odds & Ends

  • Empty and store all outdoor containers to keep them from freezing and cracking during the winter
  • Before the temps drop, hang your garden hose over a railing or from a tree branch to drain all water then roll it up and put it away
  • Mow your lawn as late into the fall as you can; grass that has been left too long at the start of winter will result in unsightly brown patches in the spring
  • Cover your compost pile with a tarp or a thick layer of hay
  • Drain the fuel from the lawn mower and clean off and store all garden tools to avoid rusting

Is there anything that we missed? Let us know what important steps you take to prepare your garden for the winter and any winter gardening tips you have in the comments below!

Tuesday, December 30, 2014

Dog Not Gone Dog Safety Vests

When hunting season is in full-swing, there is nothing more important than having the proper safety gear for you and your dog. Just as you know to wear a brightly colored jacket or vest for visibility, your four legged friend needs a bright orange dog vest to ensure they are easily seen, against any backdrop and in even the toughest conditions.

Whether you and your dog are heading out for a day of hunting or for your daily walk down the trail, a dog safety vest should be worn at all times as dogs are at an even greater risk of accidental injury as they can be easily mistaken for a deer or other game.

Dog Not Gone is a Maine-based company that makes superior quality safety vests for dogs designed for durability, fit, comfort, and foremost, safety. There is simply no better product like this available on the market. Their vests are manufactured using American made 10 Mile cloth and features their exclusive double Velcro closure to ensure the vest fits perfectly and won’t come off even in the thickest cover. Each of the styles available has a 3M reflective stripe that glows brightly even in low light settings.

Safety Dog Vest

The original, the Safety Dog Vest is available in 7 sizes that can properly fit an average small size dog (30-40 lbs.) all the way up to a large, full size dog (85-120 lbs.).

Features:

  • Genuine 3M reflective striping for high-visibility in all light conditions
  • Made from durable 10 Mile cloth (Made in USA)
  • Double Velcro closure


Safety Pack Vest

The Safety Pack Vest offers the high-visibility of the original Safety Dog Vest with the added benefit of two roomy side pockets with zip close to carry food, water, and any other gear you may need on your adventure.

Features:

  • A roomy pocket on each side with zipper close
  • Genuine 3M reflective striping for high-visibility
  • Made from durable 10 Mile cloth (Made in USA)
  • D-Ring on top for easy leash attachment
  • Double Velcro closure
  • Available in 5 sizes (32, 34, 36, 38, 42)


Mini Safety Dog Vest

For the smallest nature-loving, adventure seekers! The Mini Safety Dog Vest offers superior visibility in daytime and low light situations to ensure even the smallest pups are safe and stand out against any background. The Mini Safety Dog Vest is specially designed for the build of smaller dogs so they are as comfortable as they are safe.

Features:

  • Adjustable Velcro closures around neck and belly for secure fit
  • Genuine 3M reflective striping for high-visibility in all light conditions
  • Made from durable 10 Mile cloth (Made in USA)
  • D-Ring on top for easy leash attachment
  • Available in Small & Medium sizes


Safety Chest Vest

The Chest Vest is designed to offer unrivaled visibility as well as superior chest and belly protection against scratches, abrasions and punctures that can occur from the toughest outdoor environments. This Safety Chest Vest features an extra layer of 10 Mile cloth for added protection.

Features:

  • Double stitched continuous, 1-piece straps for strength and durability
  • Side-release buckles for quick fitting and removal
  • Genuine 3M reflective striping
  • Available in 3 sizes – small, medium, large
  • Double layer 10 mile cloth (Made in USA)

Monday, November 17, 2014

Wood Pellet Reviews

There are a number of beneficial reasons to use wood pellets to heat your home. Unpredictable and often inflated energy prices during the colder months have increased interest and usage of wood pellet stoves in an attempt to reduce energy costs.

Wood pellet heating can be used as a stand-alone home heating source or as a supplemental heat source to a central heating system. With their growing popularity, there are more pellet fuel choices than ever. We’re taking a closer look at 3 popular wood pellet brands, hopefully helping you to make the best choice for your heating needs as easy as possible.

Corinth Wood Pellets

Made in Maine from harvested local resources, Corinth wood pellets are produced from a specific blend of hardwood and softwood and are 100% natural with no added chemical binders or fillers. One 40 lb. bag can replace up to 2 1/3 gallons of home heat oil, and those who have used Corinth pellets report an exceptional amount of heat output.

Other features include:

  • Calorific Value: 8290 BTUs/Pound
  • Low ash (.51%)
  • Small, uniform pellets – average size is about ½ inch to ¾ inch
  • Long-lasting, consistent heat
  • Very little fines and sawdust

Find more information about Corinth wood pellets here.


CANAWICK Wood Pellets

CANAWICK can call rightfully call their pellets “ecological pellets” as they are made from 100% biodegradable residual sawdust. These pellets are made from premium quality hardwood free of any additives whatsoever. They provide superior heat output with very low moisture; up to 35% greater heat output compared to traditional fire wood.

Other features include:

  • Calorific Value: 8000 BTUs/Pound
  • Diameter: 6.3 mm
  • Suitable for a wide range of fireplaces or slow-burning wood stoves, fire pits, etc.
  • Environmentally-friendly and carbon neutral
  • No firebrands, reduced smoke
  • Moisture Content: 5.22%
  • Ash Content: 0.61%

Available in 40 lb. bags or by the ton. Find more information here.


Energex Wood Pellets

Energex is the largest producer of wood pellets in Canada and have been producing wood pellets out of Lac-Megantic, Quebec for about 29 years. Using a blend of softwood and hardwood produces a higher-heat burn and lower ash content (less than 1%). Free of additives and bark for a clean burn. Sold in 40 lb. bags and are also available in bulk.

Other features include:

  • Calorific Value: 8700+ BTUs/Pound
  • Ash Content: between 0.5% and 0.7%
  • Moisture Content: 5% - 6%
  • Blend of 60% softwood/40% hardwood
  • Wood Pellet Size: small
  • Produced from 100% natural wood sawdust


Have you tried any of these wood pellet brands before? We’d love to hear from you! Leave your thoughts and personal reviews in the comments section to help guide others in the community to the best possible home heating solutions.

You can find all of these wood pellets for sale at www.parisfarmersunion.com. Be sure to browse our selection of wood pellet stoves and heating accessories and be prepared for what Mother Nature has in store for us this winter!

Tuesday, November 11, 2014

Easy Canning Tips and Tricks

With all of the Mason jar glasses, Mason jar flower vases, and Mason jar lamps filling up our Pinterest boards, it is easy to forget to use them for their original purpose- canning! If you are like us and love to eat fresh seasonal food, the long stretch of winter can seem awfully flavorless without the juicy peaches and plump tomatoes that we enjoy in the summer. Although canning can seem intimidating to a first timer, canning homemade food is actually a very simple process, and you will get more comfortable with it once you dive in. Today, we are sharing some tips for canning food for first-timers.
Step One: Assemble Your Materials
While you can wash and re-use the glass and rims of the Mason jars, you must buy new lids every time to get a perfect seal that will protect your food from contamination. A canning funnel is also extremely helpful when pouring your sauces, jams, or foods into a narrow jar to prevent spillage from occurring. You will also want to purchase a canning rack, which is a metal rack that can be placed inside your large pot to easily pull the jars out of the water bath when they are done. Finally, a pair of sturdy tongs with easy grips will allow you to move your jars around without being fearful of coming into contact with scalding water or hot glass. Fortunately, many kitchenware manufacturers sell kits with all of supplies you will need for your canning project, like this one from Ball.
Step Two: Which Canning Method is Right for You?
The two predominant ways to can your foods are either by water bath canning, the style you are likely most familiar with, or by pressure canning. Water bath canning is great for high-acid foods, such as jams, jellies, fruits, tomato sauces, pickles, and salsas. Pressure canning is the safest method for low-acid foods like vegetables, soups, stews, stocks, meats, and seafood. If your recipe combines high-acid foods like tomatoes with low-acid foods like beef, pressure canning is still the safest method to prevent bacteria from contaminating your food.
Step Three: Canning Your Food
Ball, the manufacturer that we all associate with canning and jarring food, is the best source for step-by-step directions on both water bath canning and pressure canning. If you are a more visual learner, you will love this easy to follow, step-by-step video tutorial “Tips for Water Bath Canning for Dummies.” Or, if you are looking for a video on how to use a pressure canner, check out this great video.

Step Four: Enjoy!
Of course, the best benefit of canning your own recipes is having delicious homemade food to enjoy throughout the year. Once you complete the canning process, check each jar lid to be sure that the seal is strong. Press down on the lids and feel if they pop back against your finger. If they do, this means that they did not seal sufficiently, and in this case you should place it in the fridge and enjoy within the recommended time frame for that item, generally five to seven days. Otherwise, label your food with the date and place in a cool, dark place for up to a year.
What are your favorite foods to can? Do you have any special tips and tricks for canning food of your own? Let us know in the comments!
Be sure to visit us at www.parisfarmersunion.com for canning jars, lids and handy kitchen gadgets to make canning food fun, safe, easy and delicious!