Wednesday, April 29, 2015

How to Extract Honey from a Beehive

If you’ve been keeping up with our Beekeeping for Beginners blog series, you already know about the main components of a beehive and the equipment necessary to care for it. If you’ve already set up your beehive, your bees have been hard at work and you should prepare yourself to harvest the golden benefits of their labor when the time comes.

The following guide will help walk you through the steps of removing honey from the frames of your hive so you can start to enjoy your super sweet harvest!

  1. Remove bees from hive – Before removing any frames, you should first vacate the hive of any bees. You can do this in a variety of ways, but using an air compressor or a leaf blower to blow them out is a very effective method. You can also gently brush them off of each frame as you remove it, or use a specially designed bee escape that allows for bees to exit, but not reenter.
  2. Remove frames from super - When you notice that shallow frames are over 80 percent covered in sealed or “capped’ honey, you are free to remove them for extraction. However, it is also advisable to wait until frames are entirely covered or until after the completion of the last major nectar flow of the season so you get the most out of your harvest.
  3. Uncap – Hold the frame with a slight tilt over an uncapping tank as you prepare to cut away at the wax. Honey is easier to remove when it’s warm, so use a heated electric uncapping knife to delicately start slicing away at the wax cappings in an upward motion. Work bit by bit to reveal the honey on one side of the frame before doing the same on the other side. Use an uncapping fork for any wax you may have missed.
  4. Using the extractor – Once you have enough frames uncapped, place them within the extractor. The extractor will spin the frames and honey will be removed from the cells into the holding tank with centrifugal force. Once honey is removed from one side of the frame, turn frames to the opposite side and repeat. Be sure to start by slowly spinning the frames to avoid damaging the delicate wax comb. When frames are empty, you can return them to the super.
  5. Drain and strain – As the tank fills with honey, it will become more difficult for the extractor to spin, so open the valve at the bottom of the tank to begin draining the honey into the collection tank. Honey will pass through a strainer that will remove any extra wax, bee parts, and any other things that you don’t want in your supply.
  6. Package it and enjoy!

Have something to share about your first harvest? Tell us about it in the comments below and be sure to check out all of our beekeeping supplies at Paris Framers Union to make every harvest a success!

Monday, March 30, 2015

South Bend R2F2 Catfish Spin Combo w/ Kit - Review

Head out for a successful day of catfishing with South Bend’s R2F2 Catfish Spin Combo with Kit. This catfish fishing kit contains all the essential catfish fishing gear you’ll need to get started, including a South Bend fishing rod and reel, packed in a reusable plastic tackle box.

Strong Design

Catfish can be hard to catch since they are shy biters and will resist the line as much as possible. Often times this means losing your catch, a broken line and wasted bait. This two piece fiber glass rod with an EVA handle is strong enough to wrangle even the biggest catfish. The pole, complete with a graphite reel seat and size 55 spinning reel with an aluminum spool, is designed for easy use and a successful catch. The durable fiberglass construction of the R2F2 means you don’t have to worry about your pole snapping in half when the catfish resists.

Great Value

One of the best parts about this catfish fishing pole is that it comes with a kit filled with useful tools and accessories. Everything you need is packed into the tackle box for easy carrying and organized storage.

Inside the tackle box kit you will find:

  • Prespooled ball bearing
  • Chrome guides
  • Aluminum hoods
  • High visibility rod tip
  • Waterproof “How to Fish” guide

When shopping for a catfish fishing pole, you want to look for a strong and reliable rod and reel that is specifically designed for catching catfish. The R2F2 Catfish Spin Combo delivers with its durable design and fully-stocked accessory kit.

The R2F2 Catfish Spinner Combo Kit is in-stock and available for purchase.

For more information, please visit us at www.parisfarmersunion.com.

Thursday, March 19, 2015

How to Start a Lawn: Step-By-Step Instructions

Starting a lawn from scratch can be a daunting task, especially if you are dealing with some serious acreage. But with a little preparation and attention to growing conditions, you can have yourself a lush landscape in no time!
The following steps will help you in your growing venture, outlining everything from assessing the condition of your soil to picking the proper time of year to disperse your lawn seed and how to care for your lawn when it comes to life.
Typically, it is best to plant during the fall when seeds are still able to germinate in cooler temperatures without drying out. Come spring time, you’re guaranteed rolling green pastures!
Test Soil pH – Before any actual planting occurs, you will need to test the soil’s pH level to measure acidity and alkalinity to determine if the soil is ideal for nourishing seeds and encouraging growth. Measure out soil into a pH test kit and shake well. Once the soil has settled, compare the color of the test kit to the color coded chart to determine if it is already optimal for germination. Grass grows best in soil with a pH between 6.0 and 7.5, so if your pH reading is lower than 6, the soil is too acidic and you will need to add lime. If the reading is above 7.5, the soil is too alkaline and you will need to add peat moss or sulfur depending on how mild the alkalinity is. We will cover how to handle this in a later step.
Remove Rocks, Roots and Obstacles – In order to even out the soil and till it to a good consistency for seed germination, you should remove any large rocks or roots by digging them out with a shovel and filling holes with additional topsoil. Use a rotary tiller to break up any large pieces of packed earth.
Add Sand and Compost – Now that you have leveled out the soil and removed any obstructions, use a shovel to distribute approximately one inch of sand across the entire planting area as evenly as possible. Follow up with a rotary tiller to mix the sand in with the soil. Use the same method to lay one inch of compost, again using the rotary tiller to incorporate it into the sand and soil mixture.
Balance pH Levels and Add Fertilizer – If your pH reading showed that your soil was too acidic, you’ll need to add a layer of sulfur with the broadcast spreader. Finally, use the walk-behind broadcast spreader to distribute starter fertilizer across the entire area. All of these need to be applied at different rates to be effective, so take your time in distributing them across the soil and do not mix them together in the spreader if you are trying to cut down on time. You’ll need to work the fertilizer and sulfur or lime into the top layer of the soil, so use a metal garden rake to mix everything together and then level it out.
It’s Seedin’ Time – Using a handheld broadcast spreader (or a walk-behind one if you are dealing with a large plot), begin to disperse the grass seed evenly across the entire area of soil. Flip over a plastic leaf rake to use the back of the tines in order to work the seeds gently into the soil. To avoid patchy grass growth, use short strokes to avoid redistributing seeds.
Water Regularly – After you have sowed the seeds and raked them into the soil, water the entire area lightly, taking care to make sure there are no dry spots. Water two to three times daily for the first 8 to 10 days for only 5 to 10 minutes at a time so as not to wash away the seeds. Once seeds have germinated and grass begins to appear, water daily for 15 to 30 minutes at a time. Try to water in the morning when there is less evaporation so your grass can take in an adequate amount of moisture.
Do you have any lawn starting tips that worked well for you? Share with us in the comments!
If you want to turn that patch of dirt in your backyard into a beautiful green blanket of lush grass, get everything you need at Paris Farmers Union!
Monday, March 9, 2015

Bogs Footwear – Waterproof Boots – Review

Whether you are looking for a heavy-duty yet lightweight rancher boot to withstand the daily dirt and grime of farm work or the rainy season is making your feet cry out for a waterproof rain boot with a colorful pattern to match your raincoat, Bogs footwear provides a wide range of multi-purpose, durable footwear options for men, women and kids. Bogs boots are able to withstand the most casual wear to the most rugged and down-and-dirty, keeping your feet dry, protected and comfortable all the while.
Waterproof Boots for Kids
Ideal for keeping your little one’s feet dry and comfortable in the face of any activity or weather, Bogs footwear offers a more traditional rain boot, as well as their Classic Boot for kids, both of which are 100% waterproof and can be purchased insulated with 7mm of waterproof Neo-Tech lining for added protection on the interior. Available in a variety of different colors and patterns, all styles are crafted from a durable, yet soft and flexible rubber upper and feature a convenient handle punch-out for easy pull-on.
Bogs kid’s waterproof rain boots are lightweight and also feature:
  • Footbed made with DuraFresh bio-technology that fights unwanted odors
  • Bogs Max-Wick technology that moves moisture and sweat away from feet to keep them dry

Made to withstand sub-zero temperatures of up to -30°F, Bogs kid’s classic boots also feature:
  • Comfortable weight of 2lbs per pair
  • Four-way stretch inner bootie
  • Non-marking and self-cleaning outsole
  • Aegis antimicrobial insole for odor protection

Waterproof Boots for Women
From practical to trendy, Bogs offers a wide variety of durable footwear styles that are suited for any woman’s lifestyle, whether running errands in the city on a rainy day or hiking in the rugged outdoors - they’re built to last. All boots, including the new B-Moc Puff boot and even the Juno boot with its textile exterior, are 100% waterproof and designed to keep your feet comfortable and protected from the elements while maintaining a sleek and simple design that appeals to consumers.

Bogs Women’s Waterproof Classic Boot is available insulated with 7mm of waterproof Neo-Tech and is constructed from a durable hand-lasted rubber over a four-way stretch inner bootie built to wick away moisture and increase comfort with Bogs Max-Wick technology. Built with easy pull-on handle punch-outs at the top, choose between ultra-high, high, or mid heights and select a color or pattern that best suits you.
Other features include:
  • Built to withstand sub-zero temperatures up to -40° F/-40°C
  • Superior traction with non-slip and non-marking outsole
  • DuraFresh biotechnology helps fight unwanted odors
  • Dual-density, contoured EVA insole for additional warmth and insulation

A modernized version of the reputable Classic Boot, the Plimsoll is another great all-weather boot offered by Bogs Footwear. Designed for wear during any season, the Plimsoll features an updated, sleeker design with a sneaker-like fit, but still retains the easy pull-on handles and all of the features that make it one of the most durable and comfortable brands on the market. Crafted from durable, hand-lasted rubber over a four-way stretch bootie with 7mm waterproof Neo-Tech insulation, the Plimsoll also has a non-marking and self-cleaning outsole.
Other features include:
  • Made to withstand sub-zero temperatures up to -40°F
  • Keeps feet dry with Bogs Max-Wick technology
  • EVA insole contoured for added insulation and warmth
  • DuraFresh biotechnology helps fight unwanted odor

Unlike its counterparts mentioned above, the Juno Lace Tall waterproof boot is actually crafted from a soft, quilted-like machine washable fabric that can be easily folded and manipulated, making them a perfect choice for lounging around the cabin or taking in the great outdoors from the comfort of your patio. The Juno also features a quick close lacing system for easy adjustability. Designed with a slip-resistant BioGrip outsole, the Juno is 100% waterproof and is guaranteed to withstand temperatures up to -20°F/-30°C.
Like most Bogs boots, the Juno Lace Tall comes built with the following additional features:
  • Dual density, contoured EVA insole for extra insulation and warmth
  • DuraFresh biotechnology activates to keep odor at bay
  • Molded rubber outsole
  • Rebound technology in the outsole to provide extra comfort

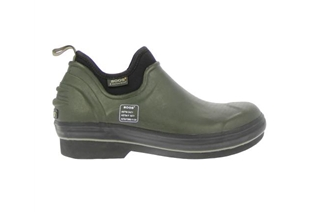
Aside from the styles mentioned above, be sure to check out the Seattle for Bogs’ low profile, trendier version of an insulated rain boot, or the Urban Farmer Shoe if you are in the market for something more rugged and built for work.
Waterproof Boots for Men
Whether you are looking for a practical slip-on for everyday wear or a hunting boot that is ideal to handle the often unexpected terrain of the great outdoors, Bogs offers a variety of men’s footwear options aside from the Classic boot style that is also available for both women and kids. As expected, all styles are 100% waterproof and are suitable for the great outdoorsman to the casual wearer.
The men’s waterproof hunting boot line offers styles that are ideal for a variety of hunting conditions, including boots that are more specialized for turkey hunting or for terrains where snakes are more prevalent, and are better tailored for your hunting style. With a hand-lasted rubber upper over a four-way stretch bootie for a snug fit, the selection of hunting boots offered by Bogs are some of the lightest on the market and are optimized with instep reinforcement to keep feet secure when running with additional comfort and warmth thanks to the EVA insole and lightweight Neo-Tech insulation. Depending on the style of hunting boot you choose, some features may vary, but rest assured that everything that makes them Bogs is intact!
If you are working in the construction field or in an area where your feet are subject to a little bit of occupational danger, you might consider investing in a pair of work boots with steel toe. Featuring the brand new Bogs BioGrip outsole designed for slip and chemical resistance, the outsole is still self-cleaning and ensures that you have the best traction on any given surface. The boot features an easily manipulated rubber upper and a rigid, wide steel shank at the toe for added protection.
Equipped with 2mm of Neo-Tech insulation and 2mm of EveryDry with Max-Wick technology to keep feet dry, this work boot also features:
  • Ability to withstand temperatures 14°F/-10°C
  • DuraFresh protection from odor
  • EVA insole for added insulation and warmth

Be sure to check out the entire range of Bogs Footwear that we carry online at Paris Farmers Union, and sound off below in the comments to let us know what your favorite pair of Bogs has been through!

Tuesday, February 24, 2015

Beekeeping for Beginners – Components of a Beehive

Since you will be relying on hundreds or even thousands of worker bees for your honey yield, it’s important to familiarize yourself with the various components of the beehive that serves as their home, workplace and breeding ground in order to ensure an ideal environment. Also, knowing how a beehive is constructed will help you in inspecting, manipulating, and managing your colony.

Whether you’re looking to build your own beehive or purchase a complete frame, the bottom-to-top guide below is sure to help you reap the sweetest of rewards.

Elevated Hive Stand

While not necessary, you might find it useful to build your hive on top of an elevated hive stand, allowing you to more easily inspect and manage your colony. Lifting your beehive off of the ground will result in opening up the entrance and likely improving air circulation.

Bottom Board

The bottom board serves as the floor of the hive, protecting your colony from the ground below. While it is normally constructed from a solid piece of wood, a screened bottom board that improves ventilation may also be installed.

Entrance Reducer

The entrance reducer is typically a notched cleat (grass works in a pinch!) that is placed loosely at the hive’s entrance and acts as a barrier in order to control access to the hive, especially at times when your hive may fall victim to invasion. It’s also useful in controlling ventilation during the cooler months. Things like a beehive entrance feeder, which allows for nourishment when natural food resources are scarce, can be attached to the entrance reducer to increase accessibility to things like food within the hive.

Deep Hive Body

Essentially boxes used to house frames of comb, deep hive bodies are typically stacked on top of each other to provide the bees with two main compartments – the lower deep and the upper deep. The lower deep is the brood chamber and is used as a nursery to raise thousands of baby bees, while the upper deep is used as the food chamber that houses honey and pollen to be used by the bees themselves. In areas that aren’t susceptible to below freezing temperatures, one deep should be fine for both the brood and their food, but food levels should be closely monitored at all times.

Plastic Queen Excluder

Designed to prevent the queen from accessing the honey supers, the queen excluder is placed between the upper deep “pantry” chamber and the supers. A wooden or plastic frame typically holds a grid of metal wire or a perforated sheet of plastic with openings that are sized to allow worker bees to move freely throughout the hive, but keep the queen from moving up out of the brood box.

Honey Super

While the honey in the upper deep belongs to the bees, whatever you collect from the honey super is surplus and yours for the taking! While identical in design and construction to deep hive bodies, supers tend to be more shallow for easier handling and come in both shallow (5 ¾ inches high) and medium (6 5/8 inches high) sizes, depending on how much honey you are expecting to collect. The lighter weight makes them easier to maneuver and the ability to stack on more honey supers as your hive grows leaves you with the opportunity to increase your sweet harvest year by year.

Frames

Where all the magic happens, the frames are where the bees build their honeycomb and their ability to be removed easily from the rest of your hive allows for easy inspection and maintenance of your colony. Each frame can also be pulled from the hive using a beekeeping frame grip. A single sheet of beeswax foundation is held by the frame and houses the combs from which you will extract your honey. Regardless of the construction of your hive, frames come in sizes made to fit deep hive bodies, and both shallow and medium honey supers.

Inner Cover and Outer Cover

The inner and outer covers are stacked at the very top of your beehive. The outer cover is a shallow tray with a hole in the center and may have a notch along one of the lengths of the frame to be positioned at the front of the hive for added ventilation. The outer cover acts as a rooftop and is typically covered with some kind of weatherproof material, like cedar shingles or aluminum flashing, for added protection. Cypress wood resists rot and is long lasting, so it’s a great option when you’re looking to buy or build your covers.

Stay tuned for more from our Beekeeping for Beginners blog post series! For any questions or comments, and all of your beekeeping needs, visit us at www.parisfarmersunion.com!

Friday, January 23, 2015

Beekeeping for Beginners - Beekeeping Supplies You Need to Get Started

If you’re ready to try your hand at beekeeping, it’s likely you already understand and appreciate all of the benefits of bee farming. But just in case… beyond having delicious, fresh honey available to you in your own backyard, beekeeping can help your garden and farm crops thrive through increased pollination, help deter aggressive Africanized honey bees by diluting the populations, provides wax from the honeycombs that can be used to create a wide range of natural products, and is an excellent stress-relieving activity.

Sounds great right?

Before you can get started, there are several beekeeping equipment must-haves you will need in order to be successful and keep yourself safe.


Beekeeping Clothing

While it is recommended that all level beekeepers wear protective clothing, it is especially important for beginner beekeepers to protect themselves against the threat of stings.

Veil – A beekeeping veil will protect your head, face and neck from beestings. Be sure to pick a veil with seamless, one-piece construction so there are no seams to inhibit your visibility.

Coveralls - Coveralls provide full-body coverage from the threat of stings. The best coveralls will be white or light in color and have elastic closures at both the ankles and wrists. Be sure you don’t wear any clothing you mind getting dirty or stained. Bees produce a waste that leaves a yellowish stain, and this is why you see so many bee handlers sporting a pair.

**IMPORTANT: Never wear clothing that has been previously stung. Bees release a pheromone when they sting to alert other bees of an attacker. By wearing previously stung clothing, you are basically inviting the bees to sting you!

Beekeeping Gloves – Many advanced or experienced bee farmers will forgo wearing gloves when tending to their bees because it is easier to manipulate and work inside the box. However, this is definitely not recommended for beginners. It is always recommended that you wear head-to-toe protection until you have gained some experience working with the bees and are confident in your abilities.

**TIP: If the coveralls you are wearing do not have elastic closures at the wrists and ankles, tuck your pants into your socks and shirt sleeves into your gloves and tie a string or some other type of band around wrists and ankles to secure clothing in place.


Beekeeping Supplies

These are the basic beekeeping supplies you will need to get started. There are many other beekeeping products available to help you get the job done faster and easier, but we will cover those in an upcoming post.

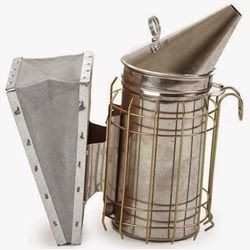
Bee Smoker – Smoke, if used properly and not excessively, will help to calm the bees and reduce your chances of being stung. A large smoker is best, as the smoke will last for a longer amount of time. Don’t forget to stock up on smoker fuel! Be sure to keep the smoker full of fuel and burning the entire time you are working with your bees.

Hive Tool – This is a device that is used like a lever to loosen both frames and boxes.

Beekeeping Brush – A beekeeping brush gently removes bees from the frames both during inspection of the hives and during removal of frames for honey extraction. The soft bristles are specially designed to remove the bees without harming them.

Hives – Perhaps one of the most important and complex pieces of equipment you will need for beekeeping, you can buy the individual pieces separately and assemble it yourself or you can purchase a complete bee hive frame that is pre-assembled for easy setup and use. We will dive deeper into bee hives in an upcoming post.


Be sure to check back for future installments of our Beekeeping for Beginners blog post series. We will be covering a wide range of topics from building a bee hive, urban beekeeping, and fun ways to use your liquid gold! Have specific questions for us about beekeeping and beekeeping equipment? Send us your questions in the comments and be sure to visit us at www.parisfarmersunion.com.

Monday, January 5, 2015

How to Winterize a Garden

When the days are at their shortest and the temperature drops, it’s time to tuck your plants in for a long, cold winter.

If you have one, you may be wondering if winterizing a garden is absolutely necessary, and the answer is no. However, if you want to save yourself a ton of extra work in the spring, it’s a must. Trust us – your springtime self will be thanking your winter self!

Preparing a garden for winter does require you to get down and dirty, but with the following tips and tricks, it will go smoothly and your plants and flowers will be ready to brave whatever Mother Nature has in store for them.

Remove Dead and Dying Plants & Clean Up Debris

The first thing you want to do is remove all weeds and dead or dying foliage that could become a breeding ground for pests and disease during the winter months. You can either dig out unwanted plants or use an herbicide. Remove as many seeds and pods from invasive plants as you can to avoid any unwanted new growth the following season. Be sure to dispose of them in a closed garbage container, not in your compost pile! If you have a large area of growth that you want to get rid of, cover the entire area with black plastic weighed down with rocks or bricks to smother the area over the winter and prevent it from spreading any further.

Nourish Your Soil Now So You’re Ready to Go in the Spring

Since you just tidied up your garden beds, it’s the perfect time to get a head start and prepare them for spring. Add a layer of compost about 3-4 inches deep across your beds. The rain and snow will help activate the compost and nutrients will leach into the beds. The remaining compost at the end of the season can be turned into soil when you start planting in the spring.


Divide Perennials Now to Minimize Shock

If you have been wanting to cut up and move sections of perennials to other areas of your yard, now is the time to do it. Perennials go dormant in the fall, so dividing them up now will help reduce shock from cutting, moving and replanting. The seasonal rain and moisture will provide them with a healthy dose of water, and in the spring, you’ll have thankful perennials that are ready to grow!

**Many perennials can benefit from division about every three to five years. A section of plants should be divided if you notice it is not flowering as well as it had in the past or if plants spread to the point of becoming invasive.

Water for Thorough Hydration During a Long Freeze

Even though the winter months can be full of rain and snow, it also comes with freezing temps that lock up vital moisture in the ground and create a drought-like situation for vegetation. Before temps drop and the ground freezes solid, give your perennials and trees a thorough watering for a good hydration status that can last throughout the season.

**If you live in an area where the ground freezes through, it is a good idea to spread a thick layer (4 to 8 inches) of mulch over your prepped gardens. This layer of mulch will serve as a blanket, protecting fragile plants from bitter temperatures and bone-chilling winds.

Protect Young and Delicate Plants from Brutal Winds

There are a number of things you can do to add an extra layer of protection to fragile foliage.

  • Loosely wrap shrubs and trees in burlap
  • Hinge together two pieces of plywood and create a tent-like cover
  • Encircle plants with wire fencing stuffed with dried leaves or straw
  • Apply an antidesiccant spray for a warm, waxy coating that doubles as a deer repellent


Clean Up Odds & Ends

  • Empty and store all outdoor containers to keep them from freezing and cracking during the winter
  • Before the temps drop, hang your garden hose over a railing or from a tree branch to drain all water then roll it up and put it away
  • Mow your lawn as late into the fall as you can; grass that has been left too long at the start of winter will result in unsightly brown patches in the spring
  • Cover your compost pile with a tarp or a thick layer of hay
  • Drain the fuel from the lawn mower and clean off and store all garden tools to avoid rusting

Is there anything that we missed? Let us know what important steps you take to prepare your garden for the winter and any winter gardening tips you have in the comments below!