
Friday, December 18, 2015

How to Raise Chickens for Eggs in Your Backyard

Chickens are a great source of fresh eggs, entertainment, and learning experiences. They are also excellent all-around pets! If you've been interested in chickens for years or if you're new to the idea, we compiled years of personal experience and insight into this comprehensive article on raising chickens for eggs.

Rules and Restrictions


Before we talk about how to raise chickens, we need to talk about the legality of keeping chickens in your area. If permitted in your community, backyard chickens can become a great hobby or a small income source. With an increased interest in urban farming, more cities are permitting our feathered friends in backyards. Today, major cities in some 40 states permit urban and suburban residents to own chickens.

New York, Los Angeles, Seattle, and Nashville are a few of the larger chicken-friendly cities. However, many communities in the United States and Canada still do not allow raising backyard chickens. Even in areas where chickens can be kept legally, there are often restrictions. These might include:

  • Roosters are not allowed.
  • Permits are required.
  • The number of hens is restricted.
  • Flock size might be based on the size of your property.
  • Coops must be at least 25 feet from buildings and property lines.
  • There must be at least 3 square feet of coop space per hen.
  • You can look up details on laws and ordinances in your area in this post at BackyardChickens.com.

Chickens are restricted in some areas because of concerns about noise, diseases, odor, and predators. Residential communities governed by homeowners associations are more likely to restrict urban farming. Check your city's ordinances online or call your city clerk. Never maintain a backyard chicken coop illegally. Respect your neighbors and all local laws.

Buying Your First Chickens


Even with a backyard flock, you still need to answer the age-old chicken or the egg question. You can start with fertilized eggs, chicks, or mature chickens. Each choice has advantages and disadvantages.

Eggs


Hatching your own eggs is an amazing and educational experience, especially if you have kids. However, you'll need specialized equipment to keep your newborn chicks safe and warm. Also, you may end up with roosters.

Chicks


Pre-sexed chicks are available from Paris Farmers Union during two order periods in the Spring. They are adorable and easier to care for than hatching eggs, but they need to be kept indoors for the first few weeks. Starting with chicks gives you a chance to bond with your hens and helps them feel at home on your property. Chicks will begin laying eggs after 20 weeks.

Juvenile or Adult Hens


If you start with pullets or adult hens, you'll be collecting eggs in no time, but you won't have the same bond with your girls. Adult hens need to be kept in the new coop for a week until they get used to their new environment and lay eggs in the same place predictably. Then, they can be given free range. Older chickens cost more, but you won't need to purchase specialized equipment for chicks.

Deciding How Many Chickens to Get


The size of your flock will depend on these factors.

  • Local laws
  • The company that is selling the chickens or eggs (Paris Farmers Union requires a minimum of 2 birds in Maine, and a minimum of 6 birds in Vermont due to local State Law)
  • The size of your backyard
  • The size of your coop
  • Your preferences
  • How many eggs you need

Many mail order hatcheries have minimum order requirements, so you might end up with a larger flock than you expected. Paris Farmers Union requires a minimum of birds to order based on current State Law (2 Birds in Maine, 6 Birds in Vermont), but don't worry, you can mix and match breeds to reach that total! If local ordinances say you can only own a few hens, you could split your order with friends. Minimum order requirements might be more flexible for eggs or adult hens.

Consider how many eggs you can realistically use. Pullets lay five or six eggs a week. Just five hens will give you two dozen eggs per week, so you might need to share extra eggs with friends, family, and neighbors. Remember that egg production decreases with age.

How to Choose a Coop Design


There are countless designs for portable and permanent coops. Portable tractor and ark coops allow you to give chickens access to a variety of fresh insects and greens in your yard. Permanent chicken coops are suitable for larger flocks.

A coop should be secure from predators, weatherproof, well-ventilated, and equipped with food and water, nesting boxes, and elevated perches for roosting. Many designs include an attached chicken run that allows the hens to forage in a protected area. If you like DIY projects, you can build a coop yourself, or you can hire a carpenter or handyman.

Traditional Coop Designs


1. WARE LITTLE RED BARN CHICKEN HUTCH


The Ware Little Red Hen Chicken Coop is a quality full free range pasture pen combining barnyard charm with real farm function. This easy-to-assemble coop features an appealing American barn design, E-Z clean metal pull pan, secure internal nest box, comfortable ramp, and large easy access doors. Make the Little Red Hen Chicken Coop an attractive addition to your yard or farm!

2. Ware Bantam Barn For Smaller Flocks


The Ware Bantam Barn is a uniquely designed coop that is perfect for smaller chicken breeds, like bantams. One side of the coop features a shingle roofed living space with multiple nest boxes, the other side features a wire pen. Hand holes are cut into the wood panels and allow you to easily lift and move the coop. Easy to assemble with screwdriver or power drill if available.

3. The Ultimate Chicken Coop from BuildEazy

 http://www.buildeazy.com/chicken_coop_1.html

This clever coop has room for eight hens. It resembles an ordinary garden shed, so it will look perfect in your backyard even if there are architectural restrictions.

Ark or Tractor Coop Designs


Often called arks or chicken tractors, portable chicken coops are easy to build and use. Open-bottom arks and tractors are ideal because they can be moved easily and they allow hens to forage for insects and take dust baths, which improves their health. This open-bottom design also means your chickens are fertilizing the ground beneath instead of creating messes for you to clean up.

1. Mother Earth's Mini Coop

 http://www.motherearthnews.com/diy/chicken-mini-coop-zmaz03fmzgoe.aspx

This basic A-frame ark features a closed-in 4-by-4 nesting area and a 4-by-5 open-air pen that's covered with galvanized mesh fencing. This portable ark can be moved by one person and will accommodate a few hens.

2. Portable PVC Chicken Tractor
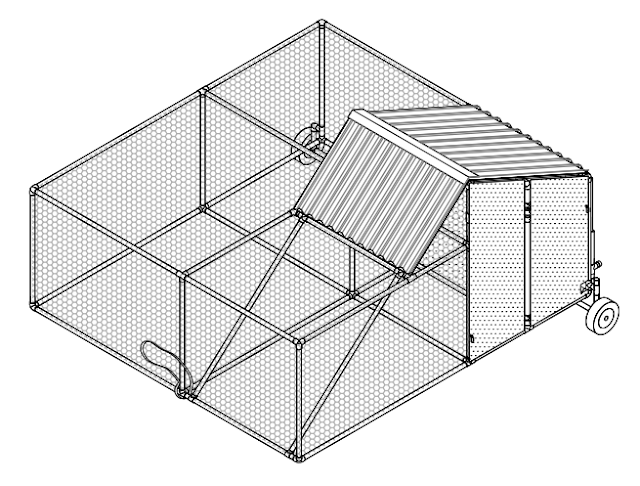
 http://www.pvcplans.com/PORTABLE POULTRY PEN -2-10-12.pdf

Made with a lightweight PVC frame, this portable coop features a small nesting area and large fenced pen. Since it has wheels, the coop can be moved in seconds.

Still considering whether to buy or make your coop?  Check out our easy-to-clean, all-in-one chicken coop.

Protecting Your Flock from Predators and Pests


A secure nesting area is essential for protecting your hens from predators.

  • During the day, hawks and birds of prey may target foraging chickens. Chickens will instinctively run for cover when they see a threat. An encounter with a predatory bird will teach them not to trust shadows or screeches overhead.
  • Shut the coop door daily around sunset. Foxes and coyotes are infamous chicken killers, but raccoons, skunks, opossums, and other critters raid coops too.
  • Watch out for stray dogs. Cats usually aren’t a problem. They’ll act interested in attacking, but chicken out. (Zing!)
  • Get your pets used to the chicks as soon as possible. If you're lucky, protective dogs may scare away predators.
  • Make sure that your chicken run is secure. If predators are a problem, invest in taller fencing or install one or two lines of electric wire.

Procuring Your Flock


There are numerous options for finding hatching eggs, chicks, and pullets. There are advantages and disadvantages to each.

  • Paris Farmers Union holds 2 Chick Days events per year. Using our Chick Order Form, you can purchase day old chicks, ducks, geese, turkeys, and guinea hens from us to pick up in our stores. There are two pickup event days, one in May, and another in June.
  • Download our 2020 Chick Order Form and fill out which breeds you would like. You can mix and match any breeds available,  but there may be a minimum of total birds required to meet local State laws. Drop off your order form in one of our stores, or you can email it to us at customerservice@parisfarmersunion.net! Just remember to note on the order form which store you would like your order sent to for pickup!
  • With so many breeds available, it's difficult to pick just one. Some adult hens do not readily accept different sized breeds. Smaller birds will be at the bottom of the pecking order, so it's better to choose one reliable variety, such as New Hampshire Reds, Buff Orpingtons, or red hybrids. If you are introducing new chicks to an established flock, you may want to keep them separated for a period of time. Keep the new birds visible, but separated from your current flock for a week or so.
  • Some hens are in the 5-pound range while others weigh 8 to 10 pounds. Base your decision on heat and cold tolerance, noise level, size, and laying habits. All of Paris Farmers Union's chicks are New England hardy.

Feeding, Watering, and Caring for Your Flock


Chicks and hens require extra care when they first arrive. Feeders and water founts should be filled daily and cleaned often. Chicks require special starter feed for the first eight weeks. Depending on your location, baby chicks may need to be kept under a brooder lamp for several weeks.

Adults can forage for insects, but they also love weeds and kitchen scraps. Paris Farmers Union carries a variety of high quality, nutritionally balanced feeds from Blue Seal, Purina, and Nutrena for all life stages, from day old chicks, to adult egg laying hens, to feed for ducks, geese, and turkeys.

Chickens use grit to break down their food. They also need crushed oyster shells or calcium supplements to increase the strength of their eggshells. A calcium deficiency can weaken the bones and result in injury as well as soft eggshells. Granite grit and powdered oyster shells can be added to feed or spread in separate trays.

Seasonal Tasks and Preparation


  • In the late summer and early fall, chickens lose feathers. The molting process may go slowing or quickly depending on the chicken and the breed.
  • Complete your fall coop maintenance and repairs before it gets too cold.
  • Add fresh layers of straw and litter to the coop floor.
  • Open the coop daily in the winter even if the chickens don't want to go outdoors.
  • Even with diminished production, collect eggs frequently to avoid freezing.
  • Invest in a heated waterer.
  • Do not over-insulate the coop or seal it too tightly.
  • Clean out composted litter in the spring.
  • Shade part of the run in the summer to protect your flock from the heat.

Have any chicken-raising tips of your own? Let us know in the comments!

Helpful links 

Poultry Supplies
Poultry Feed
Paris Farmers Union Chick Days
Monday, November 30, 2015

How to Start a Beekeeping Business and Create a Business Plan

Wondering how to start a beekeeping business, but aren’t sure where to get started? We created this scalable guide covering all the essentials to help you get started, along with tips for creating your actual beekeeping business plan.

If you’re new to the world of beekeeping, keep your day job while you build your colony up and learn the ropes. Starting a beekeeping business in this risk-reducing manner is one of the advantages of the trade. Bees venture out of their colonies only to collect nectar, pollen, food, and water, but beekeeping will require you to interact with them regularly. They thrive in any state that provides an abundance of sweet blossoms such as clover, orange, alfalfa, avocado, blueberries, buckwheat, sage, and wildflowers. Start-up financial costs for supplies are minimal, but developing a business plan requires a commitment of time.

Must-Have Items
Nice-to-Have Items
How to Get Started
Managing Your Colony
Avoiding Common Mistakes
Creating a Business Plan

Must-Have Items to Start Keeping Bees


A beehive is the first item to acquire. Bees prefer a lived-in home instead of a new one, and you can find a used hive where bees have lived for a year or more. Some experts recommend starting with two hives in case problems occur in one, but you can progress with or without a second.

If you don’t have access to a lived-in hive, here are some solid choices for getting started.
Several other types of equipment are necessary:

Personal Protection 
To protect your head from bee stings that are quite painful, you need a veil and a hat. Some hats have the veil attached, but you can also use a wide brimmed hat. A smoker helps relax the bees when you open their hive, and keeps them from activating their defenses.

Dry wood chips from a fallen tree are ideal for creating a smoldering smoke. Avoid using sawdust from treated wood! If you have a 10-inch pry bar on hand, you can use it as a tool to open the hive, or you may prefer to buy a hive tool. Either may come in handy to scrape a bee stinger from your skin should you need to.

Honey Extraction
Removing the honey from the hive requires a bee brush, an escape board, and a bee blower so that you can access the combs. The brush lets you sweep the bees aside, and the escape board gives them a place to go while you remove the super that holds frames of honey. As a beginner, you may want an experienced beekeeper to extract the honey from the super.

Winter Preparation
Wrapping the hive in insulation during the cold and wet winter months helps keep bees warm and preserves their energy. A layer of tar paper provides protection from rain, snow, and wind. It also allows the sun to warm the hive and lets moisture escape.

Nice-to-Have Items and Equipment


A bee suit covers your body except for your hands, and you need beekeeping gloves for them. As a beekeeper, you can expect to receive at least a few stings until you learn how to keep the bees calm when you open the hive. The material in a bee suit is usually a light color that does not attract bees. A loosely fitting suit allows air pockets to separate you from a bee’s stinger. Bee suits often include a hat and veil.

Paris Farmer’s Union offers Tyvek beekeeping coveralls for $29.99.

How to Get Started


Preliminary steps in setting up your beekeeping business may require complying with legal matters such as local ordinances. Obtain a business license if your municipality requires it. You need to check with your insurance agent about potential liabilities.

1. Locate hives and bees.

In the spring, look online for a directory of local suppliers of bees and hives. The one that is closest to your location is probably the best. If you can arrange to pick up the bees, you can limit the stress they experience from a commercial delivery service. Keeping them calm during travel reduces stress and helps them acclimate to their new surroundings. Meeting a local beekeeper gives you an opportunity to ask for guidance, and most beekeepers are willing to share their experience and advice.

Local or online dealers can ship a starter kit with all of the equipment that you need, and you can find an initial set of bees as well. It usually includes three pounds of bees and one mated queen. Screened in and unable to escape, they cannot sting you or your postal delivery clerk. You are likely to find a can of food (sugar water) in the cage that sustains the bees during travel. Until they have access to nectar and water, you need to continue feeding them in this way.

2. Study and learn.

Take a beekeeping class or read lots of books. Classes typically include instruction about basic hive equipment, how to inspect a beehive, finding the queen, recognizing pests and diseases, managing seasonal changes, and avoiding stings. Meeting others who have an interest in beekeeping can enhance your enjoyment of your adventure.

Links to further reading resources and our favorite beekeeping book are at the bottom of this post.

Managing Your Colony


Winter months allow time to prepare your bees to collect nectar as soon as it begins to flow. Queens start laying eggs in January to develop a workforce, and you may need to provide sugar syrup (one part water and one part sugar) to build up the strength of the workers.

By mid-February, you need to inspect the hives on a day when temperatures are at least 45 degrees Fahrenheit. Administer supplements and medications as needed early enough for your bees to assimilate the ingredients well ahead of the start of nectar flow. Look for signs of overcrowding that can cause swarming, an event that reduces colony strength. As your queen ages and produces fewer eggs, you can replace her with a younger and more prolific egg layer.

Avoiding Common Pitfalls & Mistakes


One of the most common pitfalls is a decision to “go it alone” when mentors are available. Ask your county extension office for beekeepers near you. Consider these mistakes as things to avoid:
  • failing to wear protective covering 
  • locating hives in shady, windy or marshy areas 
  • making your bees go to your neighbor’s pool for water
  • failing to provide food
  • opening the hive too frequently
  • harvesting honey the first year
Attending a class of first-time beekeepers can help you avoid pitfalls and achieve a healthy and productive colony.

Creating a Business Plan


Preparing a business plan requires you to put your ideas on paper, and it serves as a roadmap across uncharted territory. Fortunately, you do not have to figure out how to do it on your own. Going on a road trip without a map can take you to places where you do not want to go, and a business plan can make sure that you can reach your destination.

You may envision your business as a hobby that you can financially support or as one that is a major enterprise requiring investors. Developing a business plan gives you a basis for deciding its future and the likelihood of its success.

Online resources such as this educational resource from Mississippi State University can give you the advice that you need to create a solid business. UC Davis also has a great overview on starting a small beekeeping operation, including items you’ll need and how to calculate your startup cost.

If you want to start your beekeeping business, but don’t have a colony or much experience, start small! An established colony scales up later with relative ease.

You might also be interested in:
Our Urban & Backyard Beekeeping Supplies
Components of a Beehive (Beginner’s Series)
Supplies to Start Your Colony (Beginner’s Series)
The Backyard Beekeeper - $38.99 (Book)

Friday, October 16, 2015

Prepare Your Lawn for Winter: Fall Lawn Care Guide

Don't mistake slow growth as a time to stop mowing your lawn in the fall. During this time, your grass works even harder to absorb moisture and nutrients for its long dormant period. By providing attention to your grass now, you'll enjoy a greener, more vibrant lawn in the spring. Follow these fall lawn care tips for effective and time-efficient lawn maintenance for the winter.

Caring for Your Lawn in the Fall


1. Keep on mowing.

Though the fall often brings rain, it might not be enough to provide adequate water for your lawn. Continue to water the grass as needed, and mow it regularly throughout the fall. You should also drop the blade to the lowest setting for the final few cuttings of the season. Dropping the blade cuts the
grass even lower and allows abundant sunshine to reach the grass crown, resulting in less browning through the winter. In addition, sharpen your mower blade, as cutting your lawn with a dull blade does nothing but tear and damage the grass.

2. Rake the leaves.

Many homeowners wait until all the leaves have fallen off the trees before raking them into a huge pile. Don't make the same mistake. The longer the leaves stay on the ground, the more they soak up the overnight moisture, clump together, and create a tough mat over the grass. When fall arrives, begin raking or sucking up the leaves in a vacuum to protect your lawn. If you don’t, you'll risk suffocating your grass and promoting insect infestation and fungal disease growth.

3. Fertilize for spring.

Grass blades grow more slowly during cooler weather. However, the roots and rhizomes, which lie below the soil and produce both the blades and the roots, continue to grow rapidly. Applying fertilizer during the fall delivers vital nutrients, helps the roots grow deep and strong, and gives the grass a healthy start in the spring. Apply a high-nitrogen lawn fertilizer by mid- or late fall using a walk-behind drop spreader for thorough coverage.

If you don't know how much nitrogen is in the fertilizer, look at the three numbers on the label. You may see something like "25-5-5," which represents the percentage of its ingredients. The first number always refers to nitrogen, and the second and third numbers indicate the percentage of phosphorus and potassium in that order.

4. Fill in the bald spots.

Some lawns, no matter how much you maintain them, develop bald spots. Fortunately, you can buy an easy-to-apply, ready-to-use lawn repair mixture to remedy the problem. These mixtures contain fertilizer, mulch, and grass seed to jump-start those bald spots during the fall and winter months. To prepare the area, lightly break up the soil with a rake. Spread the mixture over the bald spot, flatten it lightly, and water the entire area thoroughly. Continue to water the spot at least four times a week for a minimum of two weeks.

5. Check for and remove excess thatch.

Thatch – it's the excess buildup of dead stems, roots, and shoots mingled in with living grass. It forms between the grass and the soil and develops when your lawn produces organic waste faster than it can break it down. If you leave the thatch in place, it prevents the grass from getting the air, water, and nutrients that it needs for good health.

If you’re wondering how to prepare your lawn for winter, this is a great place to start. De-thatch your lawn in early to late fall before you apply any fertilizer. Use a thatch rake to break through the thick layers, using a push-pull motion to rip the thatch out of the soil. Gather the thatch in a pile using a standard lawn rake and dispose of it accordingly. If you don’t, the thatch will kill the grass beneath, making more work for you in the springtime.

6. Control the weeds.

Though dandelions and other summer weeds seem to disappear in the fall, their roots are still in place and continue to absorb your lawn's moisture and nutrients. Whatever fertilizer you apply in the fall will just go to the weeds if you don't remove them first. In early to mid-fall, apply a lawn-friendly herbicide to the grass to fight the weeds and promote better grass growth in the spring.

7. Aerate the soil.

If you want to help your lawn take in more air, fertilizer, and water, you should aerate it in the early fall. Aeration produces small holes in the soil, providing easy passage for nutrients to reach the grass roots and rhizomes. To aerate your lawn, you can either use a powered lawn aerator or a manual aeration stick. For large lawns, it's best to use a gas-powered aerator, guiding it slowly over your lawn as it punches holes in the soil.

8. Drain any irrigation lines.

It's a good idea to drain your irrigation lines even if you have drained out the system. If not, any water that remains in the lines can freeze and expand, resulting in cracked pipe walls and backflow during the cold months. Drain the lines in late fall after your final watering of the season. For manual draining, shut off the irrigation water supply and open the manual drain valves. For automatic draining, shut off the water supply and activate the system to relieve the pressure. If you plan to drain the lines using the blow-out method, seek the advice and assistance of a licensed contractor.

Did you find our fall lawn care guide useful? Is there anything else you do to prep your lawn for the winter months? Let us know in the comments below!
Tuesday, September 29, 2015

Making a Fall Wreath from Your Own Backyard

Maybe a little sooner than you would have hoped, but here it is: fall! What better way to show our excitement and welcome fall into our homes than with DIY wreaths? One of the best things about fall wreaths is that you can use materials from your very own backyard to decorate them - and end up with an amazing wreath!

The key to making a great fall wreath is to make it seem like it came from nature itself, which is why using nature as materials is so great. This includes leaves, twigs, branches, pinecones, foliage and flowers. Using all of these materials also keeps the cost of making your wreath very low, which is always a plus no matter what season we’re in.

To give you a spark of inspiration, we’ve gathered the five best DIY fall wreath ideas and instructions on how to make them. Tackle these when you’ve got an hour or two to spare - it’s fun and relaxing, and an excuse to show off your skills!

1. Golden Leaves Wreath


Our personal favorite here at Paris Farmers Union is this simple golden leaves wreath from WildInkPress mainly because it has a twist (the gold). We mostly liked this one because it looked effortless and almost like the leaves just magically fell into that shape on the door. Get the tutorial here.

2. Sunshine Wreath


Another one we loved was this Sunshine Wreath from Yellow Mums. This one is a great pick because it seems like summer and fall came together in a wreath. It also has homages to nature with the sticks and the bright yellow rosettes. The Sunshine Wreath is the perfect wreath for someone who loves summer and fall and wants to honor both seasons. Get the tutorial from here.

3. Pinecone Wreath


The pinecone wreath from Keep Calm and Decorate is a top favorite and close to our hearts. Why? Because it allows us to show our state pride! The first thing we thought of when we saw this wreath was “what would that wreath look like with white pinecones?” For those who are unfamiliar, the white pinecone is the official Maine state flower (although it’s not really a flower). We think a wreath made of white pinecones would look beautiful plus it would help you school non-northerners who don’t know what our state flower is. Get the tutorial from Keep Calm and Decorate.

4. Fall Berry Sprigs Wreath


For those classy folks out there, the fall berry sprigs wreath from Made2Style is calling your name. We added it to the list because it was balanced and included various elements that remind us of fall, such as the foliage, berries and nice big colored leaves. Grab some branches and some leaves from your backyard to make this seasonal wreath. We would advise against real berries, though. No one wants little critters stealing the wreath at night. Get the tutorial from Made2Style.

5. Square Foliage Wreath


Finally, we wanted to end our list by shaking things up a bit. Who said that all wreaths have to be circular? ThriftyDecorChick challenges that stereotype and presents us with this one-of-a-kind square foliage wreath (which you can do using real foliage if you wish). Don’t worry about getting that square exactly right since no one will see it once you’re done. Get the tutorial here.

And that’s it, folks! We would love to see the wreaths that you all make - show us your projects on Facebook or Twitter!

Wednesday, September 2, 2015

Best Vegetables for Home Canning (With Recipes!)

If you’ve found yourself with an abundance of fresh vegetables from your garden that you know you will never be able to eat before they go bad, canning is your new best friend. Even if you’ve never tried your hand at home canning, don’t fret. It’s incredibly easy and is a wonderful way to preserve fresh vegetables so you can enjoy them for months to come.

Some vegetables are going to be better for canning than others and require slightly different cooking temperatures, time and techniques. To get you started, we’ve compiled a list of the five best vegetables for canning and included some delicious (and easy!) recipes that will make you fall in love with canning vegetables.


Cucumbers
Canning cucumbers is all about making deliciously crisp pickles. Use your pickles to top sandwiches and burgers, or just eat them straight from the jar! There are TONS of great recipes available online for all your favorite varieties… dill, sweet, bread and butter, you name it.

Dill Pickles
What you’ll need:

  • 8 pounds 3 to 4 inch-long pickling cucumbers
  • 4 cups white vinegar
  • 12 cups water
  • 2/3 cup pickling salt
  • 16 cloves garlic, peeled and halved
  • 8 sprigs fresh dill weed
  • 8 heads fresh dill weed

  1. Wash cucumbers and place in the sink with cold water and lots of ice cubes. Soak in ice water for at least 2 hours but no more than 8 hours. Refresh ice as required. Sterilize 8 (1 quart) canning jars and lids in boiling water for at least 10 minutes.
  2. In a large pot over medium-high heat, combine the vinegar, water and pickling salt. Bring the brine to a rapid boil.

Continue to the full recipe

Bread and Butter Pickles
What you’ll need:

  • 25 cucumbers, thinly sliced
  • 6 onions, thinly sliced
  • 2 green bell peppers, diced
  • 3 cloves garlic, chopped
  • ½ cup salt
  • 3 cups cider vinegar
  • 5 cups white sugar
  • 2 tablespoons mustard seed
  • 1 ½ teaspoons celery seed
  • ½ teaspoon whole cloves
  • 1 tablespoon ground turmeric

  1. In a large bowl, mix together cucumbers, onions, green bell peppers, garlic and salt. Allow to stand approximately 3 hours.
  2. In a large saucepan, mix the cider vinegar, white sugar, mustard seed, celery seed, whole cloves and turmeric. Bring to a boil.

Continue to the full recipe


Green Beans
Can your green beans so you have ready-to-use green beans available in your pantry long after peak growing season. You also don’t have to limit yourself to just green beans – string, Italian and wax beans all work just as well! The most important thing is to select beans that are tender and small; the moisture content will help them hold up better during and after the canning process.

What you’ll need:

  1. Prepare boiling water canner. Heat jars in simmering water until ready for use. Do not boil. Wash lids in warm soapy water and set bands aside.
  2. Wash and rinse beans thoroughly. Remove string, trim ends and break or cut freshly gathered green beans into 2-inch pieces. Place prepared beans in a large saucepan and cover with boiling water. Boil for 5 minutes.

Continue to the full recipe


Tomatoes
One of our favorite things to make with our fresh-grown tomatoes – salsa! There are literally endless different kinds of salsas you can make just by adding or taking away a couple ingredients and playing around with various hot peppers to achieve your preferred level of heat. Check out two of our favorite recipes: the first makes a mild, traditional tomato salsa and the second makes a wonderfully light and slightly sweet mango salsa.

Rockin’ Salsa
What you’ll need:

  • 1 red onion, chopped
  • 1 white onion, chopped
  • 1 yellow onion, chopped
  • 6 pounds fresh tomatoes, peeled and chopped
  • 2 banana peppers, chopped
  • 3 green bell peppers, chopped
  • 3 (6 ounce) cans tomato paste
  • ½ cup white vinegar
  • 2 tablespoons garlic powder
  • 1 ½ tablespoons salt
  • 1 tablespoon cayenne pepper
  • 1 ½ teaspoons ground cumin
  • ¼ cup brown sugar
  • ¼ cup white sugar
  • 8 pint canning jars with lids and rings

  1. Combine red onion, white onion, yellow onion, tomatoes, banana peppers, green peppers, tomato paste, white vinegar, garlic powder, salt, cayenne pepper, cumin, brown sugar and white sugar in a large pot. Simmer until thick, about 3 hours.
  2. Sterilize the jars and lids in boiling water for at least 5 minutes. Pack the salsa into the hot, sterilized jars, filling the jars to within ¼ inch of the top. Run a knife or a thin spatula around the inside of the jars after they have been filled to remove any air bubbles. Wipe the rims of the jars with a moist paper towel to remove any food residue. Top with lids and screw on rings.

Continue to the full recipe

Mango Salsa
What you’ll need:

  • 1 large mango, ¼ inch dice
  • 1 Roma tomato, ¼ inch dice
  • 1 tablespoon fresh cilantro, finely chopped
  • 1 teaspoon fresh lime juice
  • Pinch of sea salt
  • 1 tablespoon green onions, finely sliced (optional)
  • Finely diced chilies (optional)

  1. Combine all ingredients together and gently mix. Adjust individual ingredients to taste.
  2. Store covered in fridge until ready to use. Keeps about 3-4 days.

Continue to the original recipe


Jalapeno Peppers
If you love spice, try making hot pepper jelly! It’s a delicious treat on cold days when you want to warm up and on hot days when you need to cool down. We enjoy it best when served with crackers smeared in cream cheese!

Hot Pepper Jelly
What you’ll need:

  • 2 ½ cups finely chopped red bell peppers
  • 1 ¼ cups finely chopped green bell peppers
  • ¼ cup finely chopped jalapeno peppers
  • 1 cup apple cider vinegar
  • 1 (1.75 ounce) package powdered pectin
  • 5 cups white sugar

  1. Sterilize 6 (8 ounce) canning jars and lids according to manufacturer’s instructions. Heat water in a hot water canner.
  2. Place red bell peppers, green bell peppers and jalapeno peppers in a large saucepan over high heat. Mix in vinegar and fruit pectin. Stirring constantly, bring mixture to a full rolling boil. Quickly stir in sugar. Return to full rolling boil and boil exactly 1 minute, stirring constantly. Remove from heat and skim off any foam.

Continue to the full recipe


Beets
Beets may not be the first veggie that comes to mind when you think about canning but they hold up to the canning process extremely well and make an excellent addition to salads, tacos and quinoa bowls.

Canned Spiced Pickled Beets
What you’ll need:

  • 5 1/3 cups distilled white vinegar
  • 4 cups white sugar
  • 4 cups water
  • 2 tablespoons ground cinnamon
  • 1 ½ tablespoons salt
  • 1 tablespoon ground cloves
  • 12 pounds beets, peeled and sliced
  • 6 (1 quart) canning jars with lids and rings

  1. In a large pot, mix the white vinegar, sugar, water, cinnamon, salt and cloves together; bring the mixture to a boil and stir until the sugar has dissolved. Stir in the beets and simmer until tender, 15 to 20 minutes.
  2. Sterilize the jars, lids and rings in boiling water for at least 5 minutes. Using a slotted spoon, pack the sliced beets into the hot, sterilized jars and pour in the beet liquid to fill the jars to within ¼ inch of the top. Run a sterilized knife or a thin spatula around the inside of the jars after they have been filled to remove any air bubbles. Wipe the rims of the jars with a moist paper towel to remove any food residue. Top with lids and screw on rings.

Continue to the full recipe

Thursday, August 20, 2015

5 Fall Lawn Care Tips to Help You Prep Your Lawn for Winter

As August begins to slowly slip by, it’s important to remember that winter is just around the corner. That means it’s time to start thinking about preparing your lawn for winter, so come next spring, there will be considerably less work to be done.

Follow these 5 fall lawn care tips to best prepare your lawn for the cold months ahead.

1. Water and Mow – Continue to water and mow your lawn regularly throughout the fall to keep your lawn as healthy as possible before the temperature drops. For the last couple mows of the season, cut your grass shorter than you normally would (set the blade to the lowest setting). Doing this will allow as much sunlight as possible to penetrate the crown of the grass and cuts back on the amount of grass that can turn brown during the winter.

2. Aerate and De-Weed – Aerating your lawn will help fertilizers, seeds, and water reach deep into the root system increasing the likelihood of sustained nutrition throughout the winter months. De-weeding your yard provides a similar effect. Also, many weeds have the ability to thrive in winter months while grass is unable to grow, so removing all weeds will keep your ratio of weeds to grass in a healthy balance.

3. Rake Up Leaves – It’s important to remove any fallen leaves from your lawn, especially before they have a chance to get wet. Unattended wet leaves create a soppy blanket that will suffocate your grass and become grass fungus’s new best friend. It’s a good idea to tackle fallen foliage over a couple of raking sessions rather than letting them pile up into a heavy, unmovable mess. If you really dread raking leaves, a lawn mower fitted with a collection bag is always an option.

4. Fertilize – Fall is the best time to fertilize your lawn. Surprised? Grass leaves grow much more slowly as the temperatures get cooler but their roots continue to thrive and grow. Providing a healthy dose of fertilizer before the slowing process is set in motion will ensure your grass has all the nutrients it needs to grow strong, deep roots through the long, cold winter. Try using a fertilizer with weed control to nourish the growth you want and keep pesky weeds at bay. It’s a win-win.

5. Repair Empty Spots - Next, you’re going to want to fill in any empty spots with a lawn repair mixture (a mix of grass seed, quick-starter fertilizer and mulch). Taking the time to repair any bald patches now will make your spring lawn care that much easier. Plus, it provides nutrients to sustain your lawn through the winter, giving your lawn a leg up when the thaw comes. Spread a thick layer of the lawn repair mixture over the area, lightly compact it down and then water thoroughly. Be sure to continue to water the areas you repaired every other day for two weeks.

Winter is a difficult time of the year for your lawn, but with the proper care and preparation, you can set your grass up for success and save yourself a lot of time, money and frustration.

How do you maintain your lawn through the fall and winter months? Share your favorite lawn care tips in the comments section below!

Tuesday, July 21, 2015

6 Must-See Places to Visit in New England

New England is one of the most highly visited regions of the United States attracting thousands of vacationers each year, and for good reason. Spanning six states (Maine, New Hampshire, Massachusetts, Connecticut, Vermont and Rhode Island), the Northeast has something to offer everyone from white sand beaches to remote mountain ranges, and crystal clear lakes to cities rich with history and culture.

With so many bucket list-worthy destinations, planning a New England getaway can easily become overwhelming. The following six attractions are our top must see places in New England that will show you the very best each state has to offer.


(photo: istock)

Acadia National Park, Maine –
Designated a national park in 1919, Acadia National Park spans 47,000 acres along Maine’s pristine coastline. Located in Bar Harbor, Maine, Acadia NP boasts breathtaking ocean views, deep, unspoiled woodlands, impressive mountain peaks and glass-like lakes. You can explore the carriage-road system that runs through the park, hike, camp, swim and boat. Bar Harbor is also the home of numerous eateries, shops and lodging options. The most popular times to visit the park are during the summer and fall months.


(photo: istock)

White Mountains, New Hampshire –
The White Mountain region spans about a quarter of the state of New Hampshire and a small portion of western Maine. Part of the Northern Appalachian Mountains, they are the most rugged mountains in New England and includes Mount Washington, the highest peak in the Northeastern U.S. (6,288 feet elevation). Visitors from around the country and the world visit the White Mountains each year to hike, camp and experience the breathtaking Fall foliage. Some of the most popular attractions include the Mount Washington Auto Road and the historic Mount Washington Cog Railway.


(photo: istock)

Nantucket, Massachusetts -
For postcard-worthy vistas, white sand beaches and seafood straight from the ocean, Nantucket is the place to be. Nantucket, whose name means “faraway land or island,” is a historical New England seaport town sprinkled with late 18th- and early 19th-century architecture and lighthouses. Summer is by the far the most popular time to visit, with its population ballooning to 50,000 from its about 10,000 year-round residents. Spend lazy days soaking up the sun on a white sand beach, sailing and fishing, and finish up the day with some fresh seafood and the state’s world-famous Samuel Adams beer.


(photo: istock)

Yale University, Connecticut -
Stroll through picturesque Yale University in New Haven, Connecticut. Architecture lovers, history buffs and art enthusiast will be enchanted while touring the esteemed campus and nearby art galleries. The Yale University Art Gallery, established in 1832, is the oldest college art museum in the United States. Visit the gallery and you’ll get to experience pieces ranging from ancient times to modern day, including paintings by Picasso, Monet and Van Gogh.


(photo: waterfire.org)

WaterFire Providence, Rhode Island –
WaterFire Providence is an annual public art event that takes place along the rivers of downtown Providence, Rhode Island. Barnaby Evans first created the award-winning sculpture in 1994 and it has since evolved to become a well-known national and international community art event. WaterFire transforms the city of Providence by one hundred fires that burn along the surface of the rivers that flow through Waterplace Park and downtown Providence attracting as many as 40,000 visitors a night!


(photo: istock)

VINS Nature Center and Quechee Gorge, Vermont –
The Vermont Institute of Natural Science (VINS) Nature Center is located in Quechee, Vermont is excellent for families and bird watching enthusiasts. Offering a variety of indoor and outdoor exhibits, you can come face-to-face with a variety of fascinating birds of prey including eagles, owls, falcons and raptors. When you’re ready to stretch your legs, walk the trail to the Quechee Gorge, a spectacular spot along the Ottauquechee River offering some of Vermont’s most breathtaking views.